It is customary after some time to get bored at one’s own case, and to want it to look cool in one way or the other. One (also) useful way to modify it is to make a panel transparent, so you can see inside, and check if all fans are working, or see what’s the model no. of an HW component without using a screwdriver. This naturally applies only to tower (mini-midi-full) cases, and the guide itself uses some techniques which may not be appliable to every model; I decided it was much easier to exchange a whole panel with plexiglas, instead of sawing off a square from the original aluminium, possibily damaging it and my own fingers, and below you can see what I was able to make.

My case structure had some incisions to let some stirrups on the alumium panel to make friction and stay stable.

First, you need to provide yourself with the necessary material: a plexiglas panel, the same size of the aluminium panel you want to replace (I used a 2mm thick one), and then both a instrument to make holes in plexiglas without fracturing it (I used a screwdriver-shaped solderer to melt where I needed), and a series of straight thin metal stirrups you can easily bend.

Put the plexiglas panel in place, and with a marker draw on it the side of the holes where the grip should occur, then about 5mm ahead of it make a vertical hole with the solderer. I decided to use only the first and last holes on the upper and lower side of the panel, to reduce the amount of work, and the probability of bad alignment of all the stirrups. In this phase you should also write with a marker on the plexiglas "OUTSIDE", so you can easily find the orientation of the plexiglas against the case.

Bend the gripping side of the stirrup to reproduce the U-shaped hook on the aluminium panel, insert it in the hole, then bend again the long straight side to fix the stirrup on the plexiglas.

Try to adapt the just completed panel, which will almost for sure not be perfect, but adjusting the bending of the stirrups, or forcing them in the holes will get it to work.

Come ordinare, gestire, rinominare e taggare le collezioni di MP3
Avete per caso migliaia di MP3? Spero che siate onesti come me, e li abbiate copiati da CD originali che possiedete.
Spesso i file che… ehrm… "copiate da CD" hanno nomi strani, sono tutti in MAIUSCOLO, oppure pieni_di_underscores, non hanno un ordine giusto (Autore – Album – Traccia – Titolo), e soprattutto, non sono taggati, o sono taggati male. Purché vogliate investire un pò di tempo, e vi assicuro che sarà tempo ben speso dopo che avrete imparato ad usare questi programmi, avrete tutta la vostra collezione ordinata e pronta per essere condiv… ehm mostrata ai vostri amici facendone una lista in formato ASCII.
Prima di tutto, dovete rinominare correttamente tutti i file, ed è per qesto che useremo Magic Renamer, che potete trovare nella sezione Downloads/Tools Vari.
Essendo impossibile per me illustrare ogni possibile combinazione in cui gli errori di nominazione possono comparire in un file, vi spiegherò come correggere un singolo caso disperato: underscores (come_questa_riga), lettere maiuscole casuali (CoMe QueStA riGA), parti mancanti (autore-traccia-titolo, senza il nome dell’album), parti disordinate (come traccia-album-titolo-autore invece di autore-album-traccia-titolo, lo standard), lettere tagliate (ore-titolo invece di autore-titolo). Potrebbe esserci altro, ma basta imparare le basi e potrete cavarvela da soli.

Avviate Magic Renamer e impostatelo come segue.


Ed ora vediamo come aggiustare quei nomi di file in figura. Nel pannello superiore di Magic Renamer vedrete come i file sono attualmente nominati, e come lo saranno dopo la rielaborazione, che attuerete sostanzialmente attraverso i pannelli "Trimmer" "Replacer" e "Formatter". Un pò di strategia: dovremo aggiustare il nome dell’autore a "Natalie Imbruglia", rimuovere il punto dopo il numero della traccia, correggere le maiuscole e gli underscores, e mettere ordine alla sequenza per avere Autore – Album – Traccia – Titolo. Gli underscores e le maiuscole verranno automaticamente corrette dalle impostazioni che abbiamo già visto. Veniamo al resto.
Caricate i files in Magic Renamer sfogliando fino alla cartella che li contiene e premendo il pulsante ">>>" oppure selezionandoli singolarmente e premendo ">".
1) Aggiustare il nome dell’autore e metterlo all’inizio.

Premete il pulsante "Go!" in fondo a sinistra (potete riportare tutto a come era prima dell’ultimo cambiamente premendo il pulsante "Undo"). Ora avrete i file che cominciano per "Natalie Imbruglia", senza nome dell’album, e un punto dopo il numero della traccia, dove invece noi vogliamo un "-".
2) Sostituire il punto dopo il numero della traccia con un "-"
Disattivate il trimmer visto che non ne avete più bisogno.

Premete il pulsante Go di nuovo. Ora vi manca solo il nome dell’album.
3) "Inserire" il nome dell’album dopo l’autore.
Ehm potreste pensare che sia una cosa stupida visto che potevamo farlo prima, ma è a solo scopo educativo. Sostituite "Natalie Imbruglia" con "Natalie Imbruglia – White Lilies Island". Su, non avete bisogno della figura stavolta. Premete Go ed il gioco è fatto.
Questo è solo un modo in cui potremmo farlo, ci sono milioni di combinazioni, il gioco sta nel cercare quella più breve. Comunque, considerando che con pochi clik e battiti du tastiera rinominate almeno 10 files alla volta, il tempo lo risparmiate sempre. Vediamo un altro modo per fare la stessa cosa.
1) Aggiustare Autore E nome dell’Album nello stesso passaggio.
Tagliate i primi caratteri fino a quando non ci sono solo il numero di traccia e il titolo. Ora userete il pannello "Formatter". No anzi, che dico, tagliate TUTTO fino al titolo escluso, e cioè anche il numero di traccia e gli spazi dopo quest’ultimo. NON premete ancora Go.Ora vedremo come usare il formatter.

Premete Go ed è tutto pronto. Bello non è vero?
Un’ultima raccomandazione, ricordatevi sempre di disattivare le funzioni che non vi servono, cioè Trimmer Replacer e Formatter, perché altrimenti continueranno ad cambiare il nome del file anche se non servono più.
Ora veniamo ai tag ID3. Come saprete, ci sono due tipi di Tag ID3, l’ID3v1 (il primo, standard, con pochi caratteri disponibili) e l’ID3v2 (il nuovo, non ancora del tutto standard che però accetta più caratteri e più commenti).
Qui parlerò solo della prima versione, sia perché il solo programma gratuito e versatile per i tag che io conosca non ha il supporto per gli ID3v2, sia perché l’unico programma shareware che conosco non è così flessibile come quest’ultimo nel modificare i tag ID3v2. In realtà a me non interessa la lunghezza delle stringhe, penso che solo il 5% della mia collezione abbia titoli troppo lunghi, per cui… chissene.
Avendo detto tutto ciò, continuo con le istruzioni. Scaricate e installate Quick MP3 Tag Maker dalla sezione Downloads/AudioVideo. Sfogliate fino alla cartella contenente i file che avete appena rinominato con Magic Renamer, e aprite il pannello "Files-ID3". Ora userete la riga "Filenames to ID3" per dire al programma come prendere le singole parti del nome del file e inserirle nei tag giusti. La stringa "jolly" che uso il 99% delle volte è "%1- %3- %7 – %2" (conservare gli spazi), cioè, fintantoché il nome dei vostri file è nel formato Autore – Album – Traccia – Titolo.

Il più è fatto. Se volete rimepire anche i campi che mancano, Anno, Genere e Commenti, che non sono compresi nel nome del file, dovete aggiungerli dal pannello "Multiple" una volta per tutti i file.

Potete controllare il risultato nel pannello "Single" selezionado un file per volta.
I file sono ora pronti per essere serviti.
How to order, manage, rename, tag your MP3 collection
Have thousands of MP3 files? Literally? Hopefully, you’re like me, and your entire collection is made by ripping the original CD’s you own and you paid for.
So, often the files you …ehrm… "rip" have funny names, often they are all CAPS or are badly Capitalized, or, again, are full_of_underscores, they miss the proper order (Artist – Album Name – Track Number – Title Here), and most of all, they are badly tagged. As long as you’re willing to spend some time, and I assure you, after you can master the tools in here, it will be a short time, your whole collection will be in perfect shape and be ready to be shar– ehrm– shown to your best friends by doing an ASCII format list of them all.
First of all, we need to rename the files properly, this is what we use Magic Renamer for (get it from the Downloads/Tools section).
Since I simply cannot list evey kind of combination of naming errors you may encounter, let’s explain the worst case of them all, that is an album where the single songs have: underscores (like_this_one), wrong capitalization (LikE ThIs OnE), missing parts (like author-track-title, no album name), unordered parts (like track-album-title-author instead of author-album-track-title), trimmed letters (like hor-title instead of author-title). There may be more, but once you know how to deal with this, you’ll also learn how to use Magic Renamer yourself.
Start Magic Renamer and set it up as follows.
And now let’s see how to fix those filenames in the screenshot. In the upper panel of Magic Renamer you will see how the files are currently named, and how they will be after the "makeup", which you make essentially by working on the trimmer, replacer and formatter panels. Some strategy: we will need to fix the author name to "Natalie Imbruglia", remove the dot after the track number, adjust the case of the words, replace the underscores with spaces, and put order in the sequence to have Author – Album – Track# – Title. The underscores and word case are easily corrected by the settings we already saw. Now to the rest.
Load the files inside Magic Renamer by browsing to the folder cotaining them and pressing the ">>>" button or by selecting all the single files and pressing the ">" button.
1) Fix the author name and put it in the beginning.
Press the "Go!" button in the bottom left corner (after it you can undo to the last state by pressing "Undo"). You will now have the files beginning with "Natalie Imbruglia", no album name, and a dot after the track number, where we want instead a "-".
2) Replace the dot after the track number with a "-"
Disable the trimmer since you don’t need anymore to cut parts of the filename.
Press the Go button again. Now you miss only the album name.
3) "Insert" the album name after the Author
Errm you could find this a bit stupid, but it’s for education purposes. Replace "Natalie Imbruglia" with "Natalie Imbruglia – White Lilies Island". C’mon, you don’t need a screenshot this time. Press Go and the game is done.
This is just one way we could do it, there are millions of combinations you can use Magic Renamer, the good is to find the shorter one. Anyway, considering you are renaming at least 10 files at a time with a few clicks and typing, you’re saving time. Let’s see another way we could do it.
1) Fixing the Author AND the Album Name at the same time.
Trim the first characters until there are only the track number and title left. Now you use the formatter panel. Yeah, no biggie, since you need to learn how to use the formatter, trim ALL the characters before the title, that is remove ALSO the track numbers and spaces after them. DO NOT PRESS GO YET. Now we see how to use the formatter.
Press Go and everything is done. Easy isn’t it.
One last recommendation: always remember to disable the parts you don’t need to use, that is Trimmer, Replacer or Formatter, because they will otherwise always mess up with the filename.
Now to the ID3 Tags. There are two kind of ID3Tags, as you should know, ID3v1 (the very first, ultra-standard, few characters, one) and ID3v2 (the new, still-not-so-standard one which accepts longer strings and more fields).
Here I support only the first version, both because the only free versatile tool for tagging I know has no v2 support, and because another shareware one I know isn’t as flexible as the former creating ID3v2 tagnames. So, if you think you absolutely need to work on ID3v2 tags, the rest of the guide isn’t for you. I actually don’t care for short strings, I think they’re too short only for 5% of my collection, so who cares.
All those things being said, I go on with the directions. Download and install Quick MP3 Tag Maker from the Downloads/AudioVideo section. Browse to the folder containing the files you just renamed with Magic Renamer, and open the "Files-ID3" panel. You now will use the "Filenames to ID3" input line to tell the program how to pick up the single parts of the filename and put them in the correct tag fields. The "jolly" string I use 99% of the time is "%1- %3- %7 – %2" (space-sensitive), that is , as long as you renamed the file as I told you, in the format "Author – Album – Track – Title"
It is done, for the rought part. If you want to fill all the ID3v1 fields you are now missing, Year, Genre and Comment, which anyway are not usually included in the filename itself, go to the "Multiple" panel and add those fields to all the files in one time.
You can check the result in the "Single" panel by highlighting one file per time.
The files are ready for storage.
Come comporre suonerie per i Nokia con composer, usando file MIDI
Dopo aver scambiato il mio nuovissimo Philips Fisio 311 con il Nokia 3310 di seconda mano del babbo mi sono gettato nella personalizzazione avanzata.
Quello che avevo sempre sognato agli albori della mia esperienza coi cellulari era di poter programmare una suoneria di Monkey Island, e finalmente, dopo tante fatiche per imparare tutto il necessario, ci sono riuscito.
Questa guida è pensata per chi ha dei file MIDI delle sue canzoni favorite e vuole convertirli a suonerie, e fa uso di diversi programmi gratuiti che ho scovato sulla rete, e che potete trovare nella sezione Downloads/AudioVideo del sito, col nome di Nokia Ringotone Kit, assieme ai file di testo delle melodie che ho già programmato io.
RTTTL (semplicemente chiamato "RTTL") significa RingTone Text Transfer Language (linguaggio testuale per la composizione di suonerie) ed è il formato testo standard che descrive le note sui cellulari, per cui, almeno fino all’ultimo passaggio (che spiega come tradurre le note in tasti del Nokia), questa guida può essere usata per ogni cellulare che lo supporta, praticamente tutti quelli recenti.
Primo passo, trovate i file MIDI che volete usare:
Quindi copiateli in una cartella di lavoro, meglio se cambiando il nome con uno più semplice, magari si una sola parola, come ghost.mid e intro.mid, visto che dovrete lavorare anche dal prompt di DOS. Alla fine avviate MIDI2Tone (tonewin.exe) e aprite uno di questi file per ascoltarlo.
Usate il piccolo box in alto a destra per cambiare traccia (freccia sù/giù), fino a quando non vedete che la frequenza delle note nel grafichetto in basso a destra non segue la melodia, quindi premete il pulsante Note View:

Trascinate un rettangolo attorno all’intero gruppo di note che compongono il ritornello della melodia (le note selezionate diventano rosse), e dopo aver fatto click destro scegliete "Listen". Qui potreste avere un messaggio di errore. Se non succede, saltate direttamente tutta la parte che riguarda MIDI Transpose. Dovete sapere che il Nokia 3210, e lo stesso per il 3310 (non so per gli altri, ma dovrebbe essere uguale) supporta solo 3 ottave in luogo delle 4 dello standard RTTL. Se avviate la melodia e qualcuna di queste note si trova fuori dall’intervallo riproducibile, avrete un errore simile:
Questo significa che dovete aggiustare la melodia per farla "entrare" nell’intervallo giusto, spostanto in sù o in giù tutte le note di un certo numero di mezzitoni (qui suppongo che il lettore abbia una infarinatura di educazione musicale). In breve, se non sapete di cosa sto parlando, date un’occhiata alla schermata di MIDI2Tone in Note View: dovrete in pratica trascinare sù o giù l’intero blocco selezionato per farlo stare tutto nella fascia gialla. Nell’esempio quindi, c’è ovviamente bisogno di spostare tutto giù. Diciamo che 7 mezzitoni siano sufficienti (un’ottava si estende su 12 mezzitoni). Scompattate MIDI Transpose (conviene metterlo nella stessa cartella dei file MIDI e TXT) aprite il prompt dei comandi ([Start > Esegui> Command] in Win98/Me oppure [Start > Esegui> cmd] in Win2k/XP), andate nella cartella che contiene il file miditran.exe (saprete usare il comando "cd" spero), e date i seguenti comandi (supponendo che il file si chiami ghost.mid):

miditran -notes <+/- mezzitoni (sù o giù)> <fileoriginale>.mid <filenuovo>.mid
Il file GHOSTDOWN.MID sarà ora più in basso di 7 mezzitoni.
Quindi, se il file MIDI era a posto, oppure se siete riusciti ad aggiustarlo, riapritelo in MIDI2Tone e seguite gli stessi procedimenti fino a Note View:


Non si possono avere più di 50 note (le pause si contano come note) in una suoneria. MIDI2Tone fa il lavoraccio per voi e rimuove le pause prolungando le note rpecedenti, risparmiando spazio, me se comunque avete più di 50 note nella melodia selezionata, dovrete ridurre le note selezionate facendo click destro e scegliendo "Clear", e trascinando un rettangolo attorno alle ultime note selezionate (rosse) per rimuoverle, fino a quando la prova con "Listen" non conferma che non ci sono più di 50 note. Quando siete contenti del risultato, fate click destro e scegliete "Save as nokring" (scrivete un nome con estensione TXT).
Nel pacchetto di programmi c’è anche WBeep, un programmino DOS. Estraetelo nella stessa cartella dei file TXT, e in Esplora Risorse trascinate il file TXT appena creato con MIDI2Tone sul file EXE, che comincerà a suonare la melodia attraverso l’altoparlante interno del computer, così da avere una veloce anteprima.
Ora avviate il programma Nokring RTTL to Nokia Converter e caricate il file TST salvato in MIDI2Tone. Importante: MIDI2Tone trattiene le risorse MIDI mentre è aperto, anche se non è in playback, per cui chiudetelo se volete sentire l’audio da Nokring Converter.

Selezionate le opzioni di Nokring Converter come in figura, e premete il pulsante Get… per sfogliare le cartelle sino al file TXT salvato da MIDI2Tone (oppure usate uno dei file TXT che erano già nel file ZIP contenente i programmi). Scegliendo "Keypresses" avrete la lista dei tasti da premere per comporre la melodie, senza dover imparare il linguaggio di programmazione musicale del Nokia.

How to compose ringtones for Nokia mobile phones composer, using MIDIs
After making a deal with my father, that is exchanging my brand new Philips Fisio 311 (he gave it to me after receiving it as a gift) for his second-hand Nokia 3310 (which keeps the battery load only for 3 idle days…), I threw myself into high-end customization.
First things came first, but then I could spend some time working on ringtones: all I dreamt was to have the Monkey Island most famous themes to play on my cellphone.
This guide is thought for the ones who have MIDI files of their favourite songs and want to "translate" them to ringtones, and is made referring to some useful tools I found on the net. The downloadable ZIP containing them (Nokia Ringtone Kit), along with the tones I made myself, can be found in the Downloads/AudioVideo page.
RTTTL (simply referred to as "RTTL") stands for RingTone Text Transfer Language and is the standard text format describing notes on the cellphones, so, at least until the last passage, this guide can be used for every kind of phone supporting this standard, the only difference being that you will need to find yourself the keys to write notes, as the program I included in the package converts notes to keypresses just for Nokia phones.
First step, find a MIDI file that suits you:
Then copy them in your working folder, possibly changing the name to easier ones, like "intro.mid" and "ghost.mid" for the example, and finally start MIDI2Tone (tonewin.exe) opening one file and playing it.
Use the selector in the upper-right corner to change the channel, until you see the note frequency in the black window follows the beat and the frequency of the main melody. After that, press the Note View button:
Drag a rectangle around the whole set of notes forming the melody (selected notes become red), and after right clicking choose "Listen". You may get an error here. If you don’t, jump the paragraph regarding MIDI Transpose. The Nokia 3210, same for 3310 (don’t know about the others, but should be the same) supports only 3 octaves, while the standard RTTL reads 4 octaves. When you press Listen, if some of the notes fall outside the octave range of the phone you’ll get an error:
This means that you need to adjust the melody to fit available octaves by shifting the notes of the MIDI up or down according to the number of halftones you specify. Roughly, if you don’t know what I am talking about, take a look at the screenshot of MIDI2Tone Note View: it will drag up or down the red signs to make all of them be inside the yellow area. Supposedly, then, we need to bring them down. Let’s say 7 halftones down are sufficient. We uncompress MIDI Transpose (let’s do it in the same folder where the MIDI and TXT files are) and go to the command prompt (Start > Run > Command inside Win98/Me or Start > Run > cmd inside Win2k/XP), change to the directory containing the miditran.exe file, and do the following (supposing our file is named ghost.mid):
miditran -notes <+/- halftones (up or down)> <originalfile>.mid <newfile>.mid
The GHOSTDOWN.MID file will now be down 7 halftones.
Now if the original MIDI was OK, or you just fixed it into the new MIDI, open it inside MIDI2Tone and do the same of above:
You can’t have more than 50 notes (pauses included) in a ringtone. MIDI2Tone does the dirty job for you and removes pauses, prolonging previous beats to save space, but if after this you still have more than 50 notes, you need to reduce the selected notes by right clicking and chosing "Clear", and then again selecting the last notes to remove, untill the "Listen" dialog shows 50 notes or less. When you are happy of the results, right click in the Note View and choose "Save as nokring" (choose a name with a TXT extension).
In the package is included also WBeep, a DOS utility. Extract it in the same folder of the TXT, and in Windows Explorer drag and drop the TXT on the EXE file. It will playback the tone with the PC Speaker giving a fast preview.
After that start the Nokring RTTL to Nokia Converter and load the TXT you saved from inside MIDI2Tone. Important: MIDI2Tone gets exclusive usage of the MIDI device even if it’s not playing anything, so you need to close MIDI2Tone to hear audio from Nokring Converter.
Select the options of Nokring Converter as in figure, and press the button Get… to browse to the txt file saved from MIDI2Tone (or use one of the RTTL files I included in the ZIP). Choosing to view the keypresses, you’ll see what keys you need to type in the Nokia composer to write the notes.
or whataver, I didn’t study french
Come creare un nome di alias per il proprio indirizzo IP dinamico
Non importa che usiate una connessione con IP dinamico, oppure una connessione ADSL con IP fisso, mi sembra chiaro che, se avete un server installato, sia più simpatico avere un indirizzo del tipo "vostronome.dyndns.org" piuttosto che "151.21.7.103".
Una cosa del genere può esser fatta senza pagare un soldo, usando un servizio di aliasing, che associa in ogni momento all’indirizzo letterale che avete scelto (Esempio: pippo.dyndns.org) al vostro indirizzo IP, rendendolo disponibile a chi voglia connettersi al vostro server; vi servirà anche un programmino che controlla regolarmente il vostro indirizzo IP e lo comunica al servizio qualora questo sia cambiato dall’ultima volta. Per esempio, è sufficiente che una persona sappia che il vostro server FTP risponde all’indirizzo pippo.dyndns.org, e il vero indirizzo IP verrà trovato all’istante.
Ci sono diversi tipi di servizi che offrono questa funzione, e hanno bisogno di una diversa implementazione del programma che serve per aggiornare l’indirizzo numerico. Per l’aggiornamento automatico dell’IP potete usare i programmi consigliati dai siti che offrono il servizio gratuito, e da quando ho scritto questa guida annifa, l’unico rimasto è DynDNS.org.
DynDNS permette di scegliere il dominio a cui appartenere, infatti non esiste solo vostronome.dyndns.org, ma anche vostronome.shacknet.nu vostronome.homelinux.org e tanti altri.
Ora siete pronti. Se volete fare una prova, potete connettervi al vostro stesso server usando l’indirizzo nuovo di zecca, per vedere se funziona.
How to get an named alias for your dynamic IP
No matter if you use a DHCP connection (which means you have a different IP address for each connection – every 56k and ISDN line, and some DSL and Cable lines) or a static IP one, if you have a server installed on your machine, you may take advantage by "changing" your IP with a named address (for example, "yournick.hn.org" instead of "151.21.7.103"); for instance, the users of your server would easily remember your address.
This can be done for free, using both a service which mantains a DNS (Domain Name Server – a server which is capable of telling you the IP corresponding to an alias, like "yournick.hn.org", that would correspond to "151.21.7.103" as in the example above), and a small program which checks your IP every "n" minutes, and if it changed since the last time, sends the updated information to the service itself. So, very briefly, someone who knows you have an FTP server responding, for example, at the address ilikecandies.hn.org, port 21, would have his FTP client asking to the DNS of the service to tell him your true IP, and then would directly connect to that IP… still the only information he must remember is "ilikecandies.hn.org", and not your true IP, which is much more difficult to keep in memory).
To the practice now: there are more than one way to achieve this, and they depend from the small program you use to send out your IP. Every free service suggests free utilities to update the IP automatically, and since I wrote this guide years ago, the only service still operating is DynDNS.org.
DynDNS allows you to choose aliases different from the principal domain (which means, you can get "yournick.dyndns.org", but also "yournick.mine.nu", "yournick.homeip.net", and several others).
Eseguire backup con ImgBurn in batch per la creazione e masterizzazione di file ISO
Questa guida è basata su ImgBurn 2.4.4.0, che potete scaricare da qui. Nel caso siate capitati qui molto dopo la data di redazione della guida (maggio’09), è possibile che le funzioni descritte qui siano state nel frattempo integrate nel software dall’autore, rendendo la guida superflua.
Ad ogni modo, lo scopo della presente quida è quello di far fare a ImgBurn una cosa per cui non è realmente pensato, cioè usarlo come software di backup su dischi ottici.
Come forse sapete ImgBurn ha una funzione molto utile di masterizzazione batch di file ISO, ovvero è in grado di gestire una coda di immagini ISO in modo tale che l’unica cosa che dobbiate fare voi, oltre a premere un pulsante per avviare l’intera procedura, è togliere il DVD appena masterizzato, che espulso automaticamente, e inserire un DVD vuoto per la ISO successiva, mentre il programma fa da solo tutto il resto, quindi potete continuare a fare quello che volete col vostro pc senza distrazioni.
Quello però di cui ha assolutamente bisogno ImgBurn per la masterizzazione in batch, è una serie di immagini ISO, mentre i comuni mortali con la necessità di effettuare grandi backup hanno di solito i file memorizzati in cartelle e sottocartelle, che in questo caso vanno convertite in immagini ISO, però purtroppo ImgBurn non ha una funzione batch per la creazione di ISO, bensì solo la procedura manuale. Il lavoro che farò in questa guida servirà a fare in modo che possiate creare in batch anche le ISO, a partire da una serie di cartelle predeterminate.
La prima parte del lavoro è quella più impegnativa, anche a seconda del volume di dati da salvare: dovete fare tutto a mano, a meno che non stiate usando dei software in grado di ottimizzare la distribuzione dei file per la masterizzazione su DVD (come Ignition di KC Softwares, ma questa guida non copre tale aspetto). per farla breve, dovete creare una cartella di lavoro, nella quale creerete tante cartelle quanti saranno i DVD da masterizzare. Per fare un esempio (tutte le lettere ed i percorsi sono tratti dalla mia configurazione reale di sistema), diciamo che avete un drive con molto spazio libero, come F:, e che la vostra cartella di lavoro sia quindi F:\Burn; dovete quindi decidere quali dati andranno masterizzati, e dovrete partizionarli in pezzi da 4.3GB (cioè quanto è in grado di contenere un normale DVD registrabile), e questi "pezzi" saranno spostati/copiati in sottocartelle nella cartella di lavoro (dovreste dare a queste cartelle un nome quanto più possibile descrittivo), come nell’immagine di esempio:
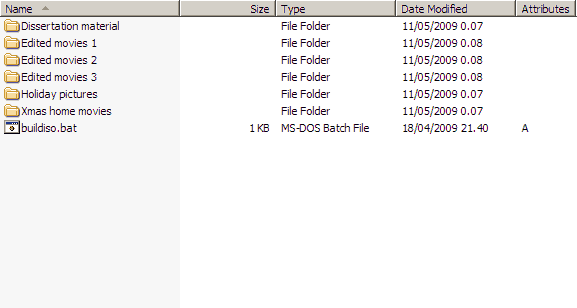
Questo lavoro potrà essere lungo, specialmente se avete molto materiale da salvare, siccome dovete trovare la migliore combinazione di partizionamento per sfruttare al massimo i 4.3GB di spazio a disposizione su ogni DVD, comunque dopo questo passaggio, il resto richiede pochissimo impegno.
A questo punto dovete impostare ImgBurn per fargli fare il lavoro a dovere (necessario solo la prima volta). Andate nel menù Tools > Settings > Build


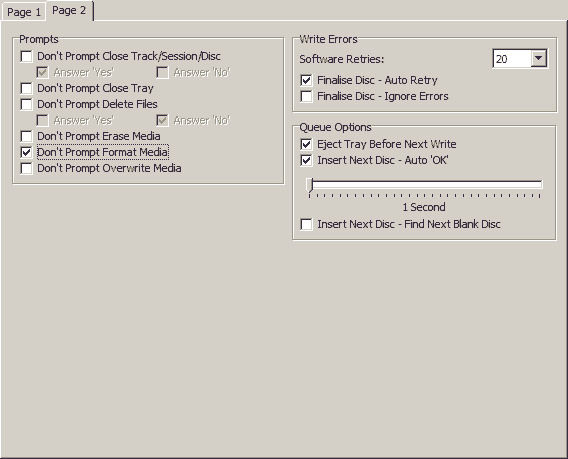
Quindi andate al pannello Write:
Adesso le preparazioni sonocomplete, e possiamo occuparci del file buildiso.bat che abbiamo visto prima. Semplicemente create un file vuoto di questo nome, inserendo al suo interno il seguente comando (accertatevi di selezionare e compiare l’intera riga, quasi certamente va fatta scorrere orizzontalmente
@for /d %%i in (*.*) do "e:\program files\tools\imgburn\imgburn.exe" /mode build /buildmode imagefile /src "%%i\" /dest "F:\Burn\%%i.iso" /FILESYSTEM "UDF" /UDFREVISION "2.01" /VOLUMELABEL "%%i" /rootfolder yes /noimagedetails /start /close
Avete bisogno di rimpiazzare i percorsi nel comando con quelli gisti nel vostro caso, dove il primo (e:\program files…) è il percorso completo del file imgburn.exe, e il secondo (F:\Burn\) è il percorso della vostra cartella di lavoro. Quello che fa questo file è invocare ImgBurn per ogni sottocartella della vostra cartella di lavoro, e creare un file ISO a partire da quest’ultima, rispettando l’albero di cartelle interno, e usando il nome della cartella sia come nome per il file ISO sia come etichetta per il volume DVD da masterizzare (è per questo che conviene scegliere un nome descrittivo per le cartelle). Qualche nota sul comando: ho usato un filesystem esclusivamente UDF, e nella revisione 2.01 (non la più recente), perché? Risponde alle mie necessità, siccome non devo masterizzare DVD video che non funzionano correttamente un UDF, ma d’altra parte posso avere necessità di fare il backup di file più grandi di 2GB; e tra le varie revisioni di UDF, controllando su Wikipedia ho scelto quella che combina le funzioni più avanzate con la massima compatibilità. Nota: i file ISO creati in questo modo non verranno aperti correttamente da 7zip, ma potranno essere montati normalmente da DaemonTools, quindi potrete comunque estrarre i files al loro interno.
A questo punto dovete avviare il procedimento automatico di creazione dei file ISO, quindi copiate il file buildiso.bat nella cartella dove avete creato le sottocartelle da masterizzare, e avviatelo, noterete come verrà fatto partire ImgBurn che inizierà immediatamente a creare il primo file ISO, dopodiché si chiuderà e proseguirà col successivo. Tenete presente che non è necessario utilizzare in questa fase la cartella di lavoro, se avete le cartelle da masterizzare su un’altra partizione, o ad esempio su un disco USB esterno, potete copiare in quella posizione il file bat, e una volta avviato, questo provvederà comunque a creare le immagini ISO nella cartella di lavoro predefinita (in questo caso F:\Burn): in questo modo non sarete obbligati a copiare tutti i file nella cartella di lavoro, se li avete già memorizzati su un altro dispositivo, purché ogni cartella contenga al massimo 4.3GB di dati.
Alla fine di tutto il processo avrete una serie di file .iso nella cartella di lavoro, assieme ai corrispondenti file .mds (per semplicità, potete cancellare tutti questi file .mds dopo aver provveduto a ordinare per tipo di file la cartella in windows explorer, nel mio caso dopo averlo fatto il tutto ha funzionato normalmente); questi files .iso sono quelli che scriverete su disco con la procedura batch di ImgBurn; potete anche cancellare, se vi è necessario, le cartelle dei dati che avete creato per le ISO, siccome a questo punto sono state già inglobate nei singoli file .iso appena creati. Quindi avviate ImgBurn e andate in Mode > Write Mode oppure scegliere Write image file to disk dal menù di avvio, e premete il pulsante col simboletto della cartella ed il segno più verde, nella sezione Source, accanto a Please select a file…, e trascinate i file .iso dalla finestra di Windows Explorer allo spazio bianco:
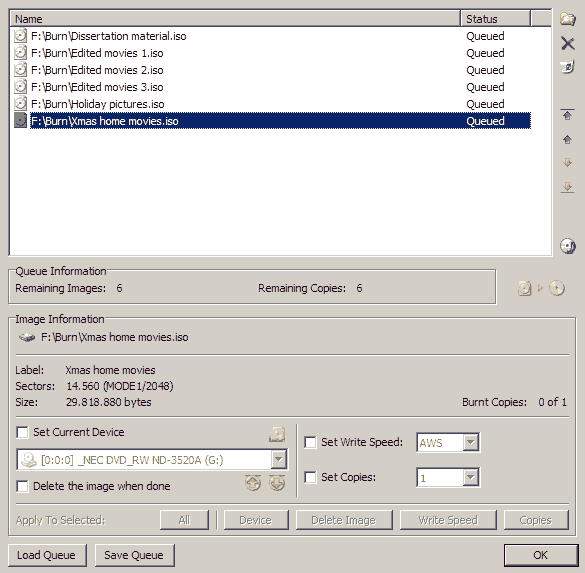
Quando la coda è stata creata ed impostata, premete il pulsante di scrittura nella finestra della coda, e la masterizzazione avrà inizio; tutto quello che dovete fare a questo punto è… farvi i fatti vostri fino a quando non verrà espulso il DVD appena msterizzato, quindi dovete sostituirlo con un altro DVD vergine, chiudere il cassettino, e la masterizzazione passerà al file successivo, tutto questo mentre siete in chat, guardate un film, navigate sul web, o perché no, giocate al vostro titolo 3D preferito.
Eseguire backup con ImgBurn in batch per la creazione e masterizzazione di file ISO
How to use ImgBurn for batch build/create/burn ISO to backup to DVD
This guide is based on ImgBurn 2.4.4.0, which you can currently get from here. In case you’re reading this guide way after the publication date (may’09), then it could be possible the author added the functionality directly in the software, rendering this howto pretty much useless
Anyway, the whole point of this guide is doing with ImgBurn what it is not really intended to do, that is using it as a backup software to reverse on optical discs your sheer volume of un-copyrighted data. The guide is suited for users wanting to backup to single-side DVD’s.
As you may, or may not, know, ImgBurn has a built-in batch function which allows you to burn in batch mode, that is, when properly set, being able to queue as much ISO images as you need, and after pressing a button, only needing to exchange the automatically ejected burned DVDs with blank ones and close the tray between an ISO and the following one, meanwhile doing whatever you may like (surfing the internet, chatting, watching a movie, or even play a videogame) without much stress on your part unless these very automated steps.
What ImgBurn absolutely needs for the batch burn function tho, is ISO images, while normal users in need to backup files usually have those files in a normal directory structure; thus, we need to convert those directory structures in ISO files to be burnt by ImgBurn, but alas ImgBurn has no batch function to build ISO files, just a plain manual routine. Our job in this guide is to make a wholly batched process both to burn ISO files *and* create them beforehand from a predetermined folder structure.
The first part of the job is the heavy one, depending on the volume of data you need to backup: you need to do this mostly manually, unless you want to use other tools to help you with the space partitioning (like Ignition by KC Softwares, but I won’t cover this in the present guide). To make it short, you need to create a work folder, in which you will then create as many folders as the DVDs will be. For the example’s sake (all drive letters and patch are taken from my real paths), let’s say you got a big drive with lots of free space, let’s make it F:, then lets say you want your work folder to be F:\Burn; you will proceed to decide what data to backup, and then you will have to partition that data in 4.3GB chunks (roughly the writeable size of a commercial DVD recordable, be it either DVD-r or DVD+r), this partitioned data will be copied/moved inside subfolders of F:\Burn, to which subfolders you will try to give descriptive names, which will be needed later on. But enough for the babbling, here’s an explicative image:
This kind of work can be long, espoecially if you have lots of material to backup, as you need to find the best way to fit everything on 4.3GB disks, but after this, all the job will be mostly done by your PC with very less intervention on your part.
Here it comes the part where you need to setup ImgBurn properly to adjust to the job; so open the application and go into Tools > Settings > Build pane
Then go to the Write pane:
You have pretty much done your preparation job in ImgBurn, we now come to the buildiso.bat file you noticed before. Simply create said file containing the command: (be sure to select/copy the whole line, the text is most probably scrolled horizontally)
@for /d %%i in (*.*) do "e:\program files\tools\imgburn\imgburn.exe" /mode build /buildmode imagefile /src "%%i\" /dest "F:\Burn\%%i.iso" /FILESYSTEM "UDF" /UDFREVISION "2.01" /VOLUMELABEL "%%i" /rootfolder yes /noimagedetails /start /close
You simply need to replace the paths in the command with the proper paths, where first path (e:\program files…) is the full path to the imgburn.exe file, and the second one (F:\Burn\) is the path to the work folder you created. What this file does, is setting up ImgBurn to go through every folder in your work folder and create an ISO image file from it, respecting its subfolder tree, and using the folder name for the ISO file name, and the ISO image label (that’s why you’d better choose descriptive folder names). Some notes on the command: here I use a one-way UDF filesystem, revision 2.01 (not the latest one), why? Because it suits my needs, as I just make backup disks, so I don’t create DVD-Video disks (UDF-only is not good for that), plus if I want to write a file larger than 2GB on disk, this way I can, without the limitation of the other filesystems; I also chose not the latest revision of UDF, as I took my time to read the relative page on Wikipedia, and checked that revision 2.01 is what pretty much gives the best functions together with the largest drive compatibility. Note: the ISO files created this way won’t be correctly opened by 7zip (to cite one program), at least on my pc, but they will be correctly mounted using DaemonTools, so you can still extract files from them.
At this point, you need to batch build the ISO files with the bat file, so copy the buildiso.bat in the root of the directory containing the data folders and start it, you will notice ImgBurn will appear and will begin creating the first ISO, after which it will autoclose and proceed to the next one. Notice that you don’t really need to have data folders and bat file in the same work directory you chose to contain the ISO files. Given how the batch file works, you can have those folders (always together with the bat file) anywhere else, for example on an external USB drive, or even network folder (even if it’s not recommended for transfer-speed reasons), in the end the ISO files will be created anyway in the work directory you chose (F:\Burn in this example): this way you don’t need to copy the folders over to another drive, in case you have them already stored elsewhere, just be sure each folder contains only up to 4.3GB of stuff.
At the very end of this process you will have a bunch of big .iso files in the work directory, together with corresponding .mds files (for easiness of the procedure you can use Sort files by type in Windows Explorer and delete all the .mds files, I did in my case and it all worked perfectly), and those are the files you need to batch write using ImbBurn; at this point you can choose to delete the source folders in case you don’t plan to use the data afterwards, since you got the ISO files coming from them. So, open ImgBurn and go to Write mode or even choose Write image file to disk from the Ez-Mode picker menu, and press the button with the folder symbol overlapped by a plus sign, in the source section on the left of Please select a file…, and a menu to queue up ISO files to be burned will appear; here you only need to drag’n’drop the ISO files from the Windows Explorer window to the white space in the menu:
When the queueing is done, just press the Write button in the queue window and the backup to DVD will start; all you will need to do at this point is mind your very own business until the tray gets ejected, and which point you take out the warm just burned DVD and put a new blank one inside, closing the tray; ImgBurn will start writing the next ISO file as soon as it detects the blank disk has been inserted, until all the ISO files have been burned. Enjoy.
Come installare configurare e gestire un server FTP
Nota del 2008: attualmente, il server FTP gratuito più completo è FileZilla, ma non ho tempo, voglia e risorse per modificare l’intera guida al nuovo software; i principi generali sono comunque gli stessi, e potete seguire questa guida per applicarli.
Questo è dedicato a tutti coloro che tra voi vorrebbero condividere con altri i propri file, come MP3, film, immagini,programmi GRATUITI, e… beh qualunque cosa vi suggerisca la vostra mente perversa .
Essendoci diversi programmi di Server FTP disponibili, e, così come per i client FTP, essendo alcuni gratis, metterò qui una guida su come installarne uno (e cioè WarFTPDaemon, il più potente, anche se non quello più facile; potete scaricare anche GuildFTP, che invece è molto carino graficamente, e permette una notevole interazione con mIRC). Per scaricare i file dirigetevi senza indugio nella sezione Downloads/Internet di questo sito.
Ed ora cominciamo.
Scompattate il file zip e avviate il setup, dopo di che avviate il programma installato.
Adesso veniamo ai fatti.

Quando il server è avviato, dovremo impostare il massimo numero di utenti, su quale porta sarà in "ascolto", eccetera eccetera.
Proprio adesso avete l’opportunità di cambiare porta: mettete un numero differente da 21 se volete. Potreste usare qualunque numero, se non fosse che alcuni qualche volta sono riservati, per cui, per evitare problemi, mettetene uno tra 1024 e 65000. Massimo numero di utenti: se avete un modem 56k, mettetene 2, 3 se avete un ISDN 64k, 5-6 con un ISDN 128k, 8-10 per un ADSL. Ma è comunque una vostra scelta, più utenti metterete, e, se sono tutti collegati, più lento andrà ciascuno di loro .
Seconda cosa, dovrete impostare gli utenti. Una scelta è quella di fare un account per ciascuna persona che pensate possa collegarsi, con NomeUtente e Password personalizzate; o se, per esempio, condividete le vostre canzoni in un canale di IRC, è molto meglio creare un solo account, con una coppia fissa di NomeUtente e Password, ad esempio nomecanale/paroladordine (ehi è solo un esempio ). Avrete quindi bisogno di impostare quali cartelle ogni utente potrà accedere, e quali diritti avrà in quelle stesse cartelle.


Quando avete impostato gli utenti, dovete metter mano alle impostazioni generali, facendo [Properties > Options]. Non metterò una figura per ogni cosa, perché potete seguire anche leggendo. Ora avete il pannello [oprions > General] di fronte a voi. Consiglio di attivare Go online when started and minimize così che non dovrete pensarci più (aggiungete anche il programma in [Start > Programmi > Esecuzuine Automatica] in modo tale che si avvii assieme a Windows). Le altre opzioni sono lasciate a voi, di solito non serve cambiar nulla (attivando Advanced. Please enable all options troverete che il pannello Edit User sarà un pò più popolato… ma nulla che sia veramente utile).
Passate al pannello Server Name (ignoreremo tutti gli altri pannelli, stanno bene come sono ). In questo pannello, potete scrivere un nome er il vostro server, ad esempio "Il server di canzoni di Pinco Pallino", e se volete, anche la vosta email, oppure lasciate quella fasulla che già c’è.
Fatto! Cioè… quasi… in realtà le due più belle capacità di WarFTPd sono il mappaggio delle cartelle, ed il Virtual File System. Visto che ora potete già condividere i vostri file, se vi basta così potete evitare di leggere oltre. Ma se volete aggiungere diverse cartelle, magari su dischi/partizioni diversi (per esempio una di canzoni, una con immagini, un’altra con programmi, eccetera… e magari anche una cartella dove permettere agli utenti di mandarvi i loro file) potrebbe essere MOLTO utile attivare il mappaggio del disco (eviterò di spiegarvi anche come funziona il Virtual File System, sarebbe troppo complicato, e non necessario, se non per esigenze particolari; il mappaggio è più che sufficiente).
Facciamo un esempio: avete le vostre canzoni nella partizione G:\, qualche immagine in F:\Docz\Immagini\blahblah\, e volete aggiungere anche una cartella per i file che vi mandano gli utenti, tipo F:\Temp\Uploads\ (beh… questo è pressappoco come è organizzato il mio disco, forse voi non avrete così tante partizioni, ma basta cambiare lettere/percorso e il discorso è sempre lo stesso ).
Sarebbe una buona idea creare una cartella vuota solo per il server (che farebbe da "contenitore virtuale" per i collegamenti alle altre cartelle che si trovano sparse sul disco e che volete condividere), ad esempio F:\FTP\.
Quello che dovrete fare è aggiungere la cartella vuota nel pannello File Access come ho spiegato prima. In questo caso, attivate Read, List (dir), Recursive, Root e Home. Poi dovrete aggiungere tutte le altre cartelle che contengono i file che volete condividere, e selezionare Read, List (dir), Recursive e Mapping.


Potete aggiungere quante cartelle volete, appariranno tutte come sottocartelle di quella principale.
Uffff adesso è finita per davvero.
Anzi no! Non ancora! Volete provare a vedere come funziona il vostro server, anche se non siete connessi ad internet in quel momento? Potete fare tutto offline: usate un client FTP, e mettete tutti i dati del vostro server (porta, NomeUtente, Password), MA usate 127.0.0.1 come IP. Vi connetterete al vostro stesso computer, e vedrete il server come un ipotetico utente estrno farebbe.