This guide is based on ImgBurn 2.4.4.0, which you can currently get from here. In case you’re reading this guide way after the publication date (may’09), then it could be possible the author added the functionality directly in the software, rendering this howto pretty much useless
Anyway, the whole point of this guide is doing with ImgBurn what it is not really intended to do, that is using it as a backup software to reverse on optical discs your sheer volume of un-copyrighted data. The guide is suited for users wanting to backup to single-side DVD’s.
As you may, or may not, know, ImgBurn has a built-in batch function which allows you to burn in batch mode, that is, when properly set, being able to queue as much ISO images as you need, and after pressing a button, only needing to exchange the automatically ejected burned DVDs with blank ones and close the tray between an ISO and the following one, meanwhile doing whatever you may like (surfing the internet, chatting, watching a movie, or even play a videogame) without much stress on your part unless these very automated steps.
What ImgBurn absolutely needs for the batch burn function tho, is ISO images, while normal users in need to backup files usually have those files in a normal directory structure; thus, we need to convert those directory structures in ISO files to be burnt by ImgBurn, but alas ImgBurn has no batch function to build ISO files, just a plain manual routine. Our job in this guide is to make a wholly batched process both to burn ISO files *and* create them beforehand from a predetermined folder structure.
The first part of the job is the heavy one, depending on the volume of data you need to backup: you need to do this mostly manually, unless you want to use other tools to help you with the space partitioning (like Ignition by KC Softwares, but I won’t cover this in the present guide). To make it short, you need to create a work folder, in which you will then create as many folders as the DVDs will be. For the example’s sake (all drive letters and patch are taken from my real paths), let’s say you got a big drive with lots of free space, let’s make it F:, then lets say you want your work folder to be F:\Burn; you will proceed to decide what data to backup, and then you will have to partition that data in 4.3GB chunks (roughly the writeable size of a commercial DVD recordable, be it either DVD-r or DVD+r), this partitioned data will be copied/moved inside subfolders of F:\Burn, to which subfolders you will try to give descriptive names, which will be needed later on. But enough for the babbling, here’s an explicative image:
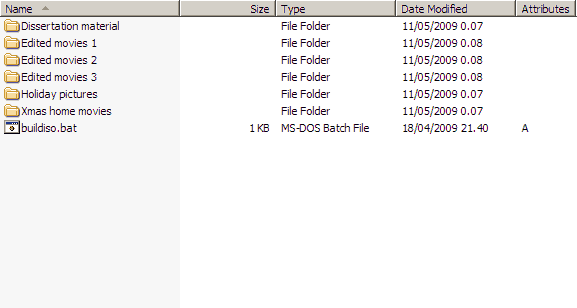
This kind of work can be long, espoecially if you have lots of material to backup, as you need to find the best way to fit everything on 4.3GB disks, but after this, all the job will be mostly done by your PC with very less intervention on your part.
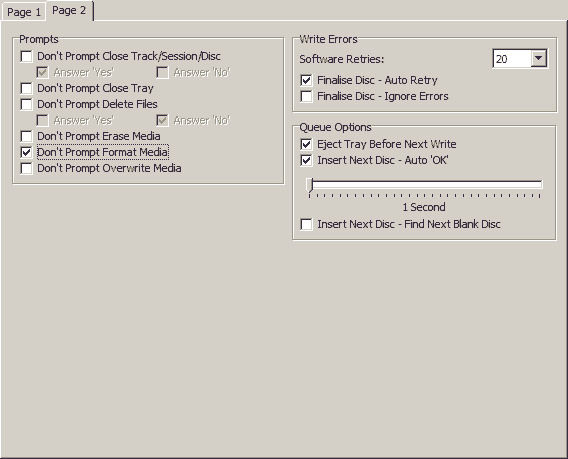
Here it comes the part where you need to setup ImgBurn properly to adjust to the job; so open the application and go into Tools > Settings > Build pane


Then go to the Write pane:
You have pretty much done your preparation job in ImgBurn, we now come to the buildiso.bat file you noticed before. Simply create said file containing the command: (be sure to select/copy the whole line, the text is most probably scrolled horizontally)
@for /d %%i in (*.*) do "e:\program files\tools\imgburn\imgburn.exe" /mode build /buildmode imagefile /src "%%i\" /dest "F:\Burn\%%i.iso" /FILESYSTEM "UDF" /UDFREVISION "2.01" /VOLUMELABEL "%%i" /rootfolder yes /noimagedetails /start /close
You simply need to replace the paths in the command with the proper paths, where first path (e:\program files…) is the full path to the imgburn.exe file, and the second one (F:\Burn\) is the path to the work folder you created. What this file does, is setting up ImgBurn to go through every folder in your work folder and create an ISO image file from it, respecting its subfolder tree, and using the folder name for the ISO file name, and the ISO image label (that’s why you’d better choose descriptive folder names). Some notes on the command: here I use a one-way UDF filesystem, revision 2.01 (not the latest one), why? Because it suits my needs, as I just make backup disks, so I don’t create DVD-Video disks (UDF-only is not good for that), plus if I want to write a file larger than 2GB on disk, this way I can, without the limitation of the other filesystems; I also chose not the latest revision of UDF, as I took my time to read the relative page on Wikipedia, and checked that revision 2.01 is what pretty much gives the best functions together with the largest drive compatibility. Note: the ISO files created this way won’t be correctly opened by 7zip (to cite one program), at least on my pc, but they will be correctly mounted using DaemonTools, so you can still extract files from them.
At this point, you need to batch build the ISO files with the bat file, so copy the buildiso.bat in the root of the directory containing the data folders and start it, you will notice ImgBurn will appear and will begin creating the first ISO, after which it will autoclose and proceed to the next one. Notice that you don’t really need to have data folders and bat file in the same work directory you chose to contain the ISO files. Given how the batch file works, you can have those folders (always together with the bat file) anywhere else, for example on an external USB drive, or even network folder (even if it’s not recommended for transfer-speed reasons), in the end the ISO files will be created anyway in the work directory you chose (F:\Burn in this example): this way you don’t need to copy the folders over to another drive, in case you have them already stored elsewhere, just be sure each folder contains only up to 4.3GB of stuff.
At the very end of this process you will have a bunch of big .iso files in the work directory, together with corresponding .mds files (for easiness of the procedure you can use Sort files by type in Windows Explorer and delete all the .mds files, I did in my case and it all worked perfectly), and those are the files you need to batch write using ImbBurn; at this point you can choose to delete the source folders in case you don’t plan to use the data afterwards, since you got the ISO files coming from them. So, open ImgBurn and go to Write mode or even choose Write image file to disk from the Ez-Mode picker menu, and press the button with the folder symbol overlapped by a plus sign, in the source section on the left of Please select a file…, and a menu to queue up ISO files to be burned will appear; here you only need to drag’n’drop the ISO files from the Windows Explorer window to the white space in the menu:
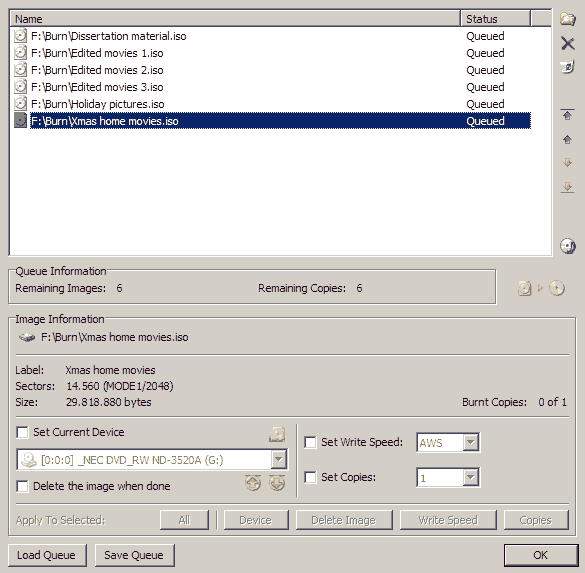
When the queueing is done, just press the Write button in the queue window and the backup to DVD will start; all you will need to do at this point is mind your very own business until the tray gets ejected, and which point you take out the warm just burned DVD and put a new blank one inside, closing the tray; ImgBurn will start writing the next ISO file as soon as it detects the blank disk has been inserted, until all the ISO files have been burned. Enjoy.